Items (0)
Total: $0.00

The cooler months invite you to pause, reflect, and create. It’s your season to craft with purpose and create joy with your hands, and essential oils are the perfect tools to bring magical moments to life! These festive DIY projects are simple, fun, and full of heart, sparking creativity and laughter during spooky season and bringing comfort and care to holiday gifting.

Essential Oil Costumes

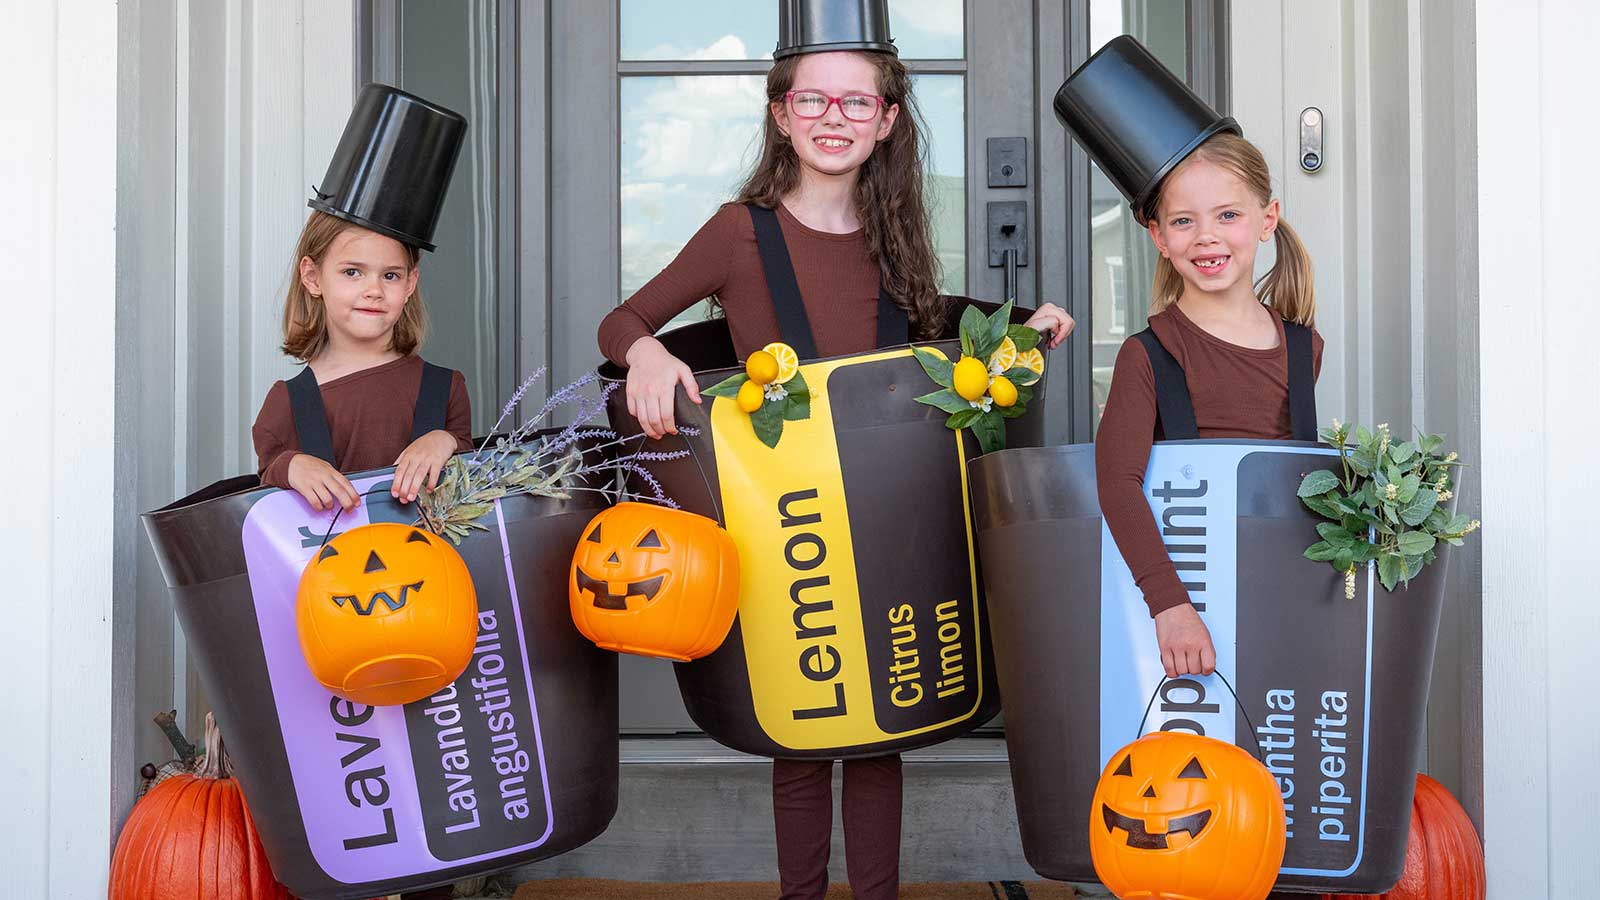
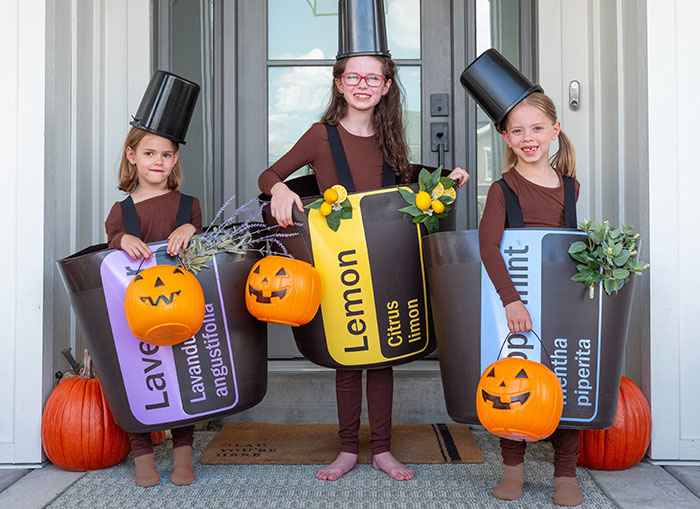
Make your family’s Halloween getups stand out with these two essential oil bottle costumes. They’re creative and cute, plus they double as a great conversation starter. Choose the design you’re comfortable with creating, download the essential oil labels with the following QR code, and get crafting to show your doTERRA pride!

Link to Downloads

QR code

DIY doTERRA T-Shirt Design

Materials Needed:

  • Blank T-shirt
  • Transfer paper
  • Printer
  • Iron, preferably with a dry setting (no steam)
  • Scissors
  • Optional: parchment paper, to protect the iron and shirt while ironing

This project involves the use of a hot iron. Always operate an iron on a heat-safe surface and never leave it unattended while plugged in or hot. Use caution to avoid burns or damage to the shirt or other materials. Before storing, allow the iron to cool completely.

Instructions:

  1. Prepare your design.
    • Download the doTERRA label you want.
    • If using light-colored transfer paper, mirror the image before printing. (The image is transferred in reverse.)
    • Load the transfer paper into your printer and print the design.
  2. Prepare the shirt and transfer paper.
    • Iron the shirt to remove any wrinkles that might interfere with the transfer.
    • Carefully cut out the printed design, leaving a small border around it.
    • Place the transfer paper face-down on the desired area of the shirt (or face-up for dark shirts, depending on the type).
  3. Apply heat and transfer the design.
    • Set your iron to the appropriate temperature (usually high with no steam), according to the transfer paper instructions.
    • If desired, place the parchment paper over the transfer paper.
    • Iron with firm, even pressure for the recommended time. (The time will vary based on the size of the design.)
    • Allow the shirt and transfer paper to cool down (usually 2–3 minutes) before carefully peeling off the backing. Ensure the design is fully transferred and bonded to the shirt.
  4. Wash the shirt inside out in cold water on a gentle cycle.
  5. Tumble-dry on low or hang. Avoid high heat when drying to help preserve the design.
Three boys dressed up as doTERRA essential oils for Halloween Three boys dressed up as doTERRA essential oils for Halloween

DIY doTERRA Bottle Design

Materials Needed:

  • 32-gallon brown (amber) plastic garbage can
  • 20-inch × 13-inch vinyl doTERRA label
  • 4 1-inch screws
  • 8 1-inch washers
  • 3-inch-width black or brown elastic, for the shoulder straps
  • ¼-inch black elastic, for the bottle cap
  • 220-grit sandpaper
  • 1.5-liter black container, for the bottle cap
  • Handheld electric saw with 10-inch blade
  • Drill with ¼-inch bit
  • Scissors or utility knife
  • Hot glue gun or E6000, for securing decorative elements

Optional: Decorative botanicals based on the essential oil

  • Lavender stems and blooms for Lavender
  • Lemons and lemon leaves for Lemon
  • Mint stems and leaves for Peppermint

This project involves the use of power tools like electric saws and drills. Always prioritize safety and follow correct protocol before operating power tools. Use appropriate personal protective equipment (PPE), including safety goggles, gloves, and earmuffs. Ensure you’re familiar with the operation of the power tool before use. Work in a well-ventilated, well-lit area and keep your workspace clean and free of hazards. doTERRA is not responsible for any injury or damage resulting from the use or misuse of these tools.

Instructions:

  1. Prepare the garbage can (the essential oil bottle body).
    • Acquire a 32-gallon brown (amber) garbage can. (It’ll serve as the essential oil bottle.)
    • Use a handheld electric saw with a 10-inch blade to cut off the top 8 inches, including the handles. (There may be a natural line to follow—if not, draw a line based on the handle placement.)
    • Cut out the bottom of the garbage can, keeping the curved shape to help the can hold its structure and resemble the base of a bottle. (For a 32-gallon can, it’ll be about 12 inches of the bottom.)
  2. Use 220-grit sandpaper to smooth rough or jagged edges where cuts were made, removing plastic flakes and helping prevent sharp edges.
  3. Attach the shoulder straps.
    • Determine strap placement based on where the wearer’s shoulders will sit in the can.
    • Drill ¼-inch holes into the front and back of the can.
    • Cut 2 lengths of 3-inch-width black or brown elastic.
    • On each strap end, cut a small vertical slit to avoid fraying.
    • Place a screw through the hole in the can, then sandwich the strap with washers on each side inside the can’s wall.
  4. Apply the label and decorate.
    • Apply the 20-inch × 13-inch vinyl doTERRA label to the front of the can. To avoid air bubbles, use a hard plastic card to smooth out the design before removing the transfer tape.
    • If desired, add botanical elements (lavender, lemons, mint) near the label using quick-drying glue.
  5. Make the bottle cap hat.
    • Use a 1.5-liter black container as the bottle cap (something like a large black soda bottle works well).
    • Drill a ½-inch hole in the middle of the container on either side, near the open end.
    • Thread ¼-inch black elastic through the holes and tie a secure knot on each end to hold the elastic in place. (This elastic strap will go under the wearer’s chin to hold the cap in place like a hat.)
Three girls dressed up as doTERRA essential oils for Halloween Three girls dressed up as doTERRA essential oils for Halloween

Select Your Continent

Select Your Region

Select Your Location

Select Your Language